The second formation we’ll discuss is the Diagonal. In a vacuum, the Diagonal doesn’t seem powerful at all. It is prone to a double jump threat, and it doesn’t present an immediate danger to the opposition. However, when building an attack, or establishing a defense, Diagonals are versatile and formidable.

Figure 1
In Figure 1 The Gold stones on F4 and G3 are aligned in a diagonal formation and Silver is threatening them with a double capture. Gold has several options to defend the impending attack, and maybe even launch a counterattack.

Figure 2
In figure 2, Gold moves the stone on F4 – G4. There are times when a regression (retreating from a Prime space to a Perimeter space) can be very effective, but this isn’t one of those times. While the threat of a double jump has been negated, this is a losing move. The stone on B2 is Gold’s only piece in a Prime space and it’s likely doomed, as is the Gold player. Let’s explore some other options.

Figure 3
In Figure 3, F4 – F5 also diffuses the threat, but it separates the only stones the Gold player has working together and weakens his board tremendously.

Figure 4
In Figure 4, G3 – G4 is a much stronger play. It diffuses Silver’s attack, and not only keeps the Gold stones connected but also allows Gold to maintain a presence in the center of the board. The down side to this play is that Silver still has initiative and will be able to start moving the stones on A7, D7, and F7 into Prime spaces and likely build a very powerful presence in the center of the board.
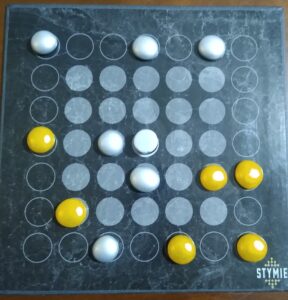
Figure 5
In Figure 5, by moving F4 – F3, Gold not only stops Silver’s double jump opportunity, he creates a double capture threat against the Silver stones on C4 and D3 and opens up either F5 or G5 to put a new stone into play. Obviously the Silver stones on C4 and D3 also form a diagonal and there are a multitude of ways he can respond to Gold’s threat.

+ for the post
+ for the post